Below given tutorial will assist you to Download Phoenix OS for Windows 7, 8, 8.1, 10 PC with detailed instructions. Phoenix OS is an Android-based operating system, especially for Windows and Mac. Furthermore, it looks and feels a lot like the famous Remix OS but has many advantages over it. Phoenix OS is fully compatible with the Android ecosystem and supports all Android apps and games. On the other hand, it comes with some pre-installed apps like Stardust Browser and WPS Office. Moreover, you can also download applications from Google Play Store, Aptoide, Mobogenie, or F-Droid. Due to its desktop-friendly interface, support for multiple tasks, and easy switching between apps, Phoenix OS is rapidly becoming popular. This is the reason it is updated regularly with new features and enhancements. Furthermore, there is also an ARM version of Phoenix OS and a 32-bit version which will be available soon. Let’s proceed to our actual tutorial on how to install Phoenix OS on your computer.
Phoenix OS System Requirements
Operating System: Windows 7, 8, 8.1, 10 or Vista Processor: Intel Pentium 4 or Later, AMD Equivalent, or Surface Pro Free Disk Space: 30MB
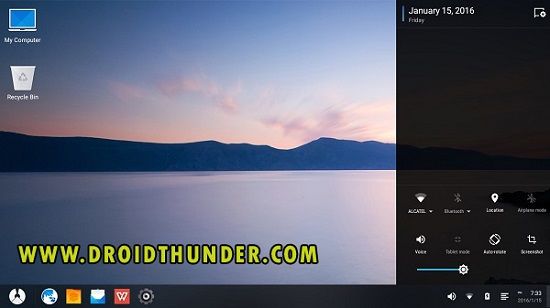
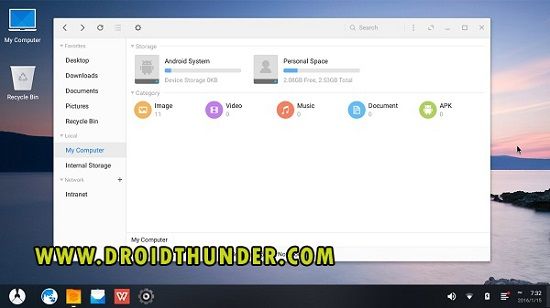
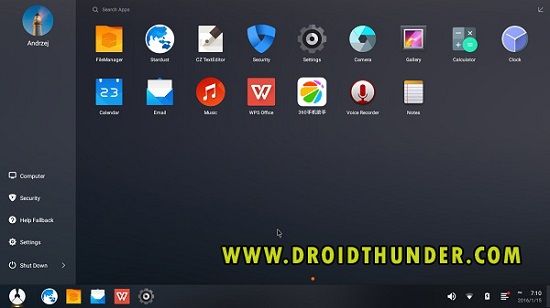
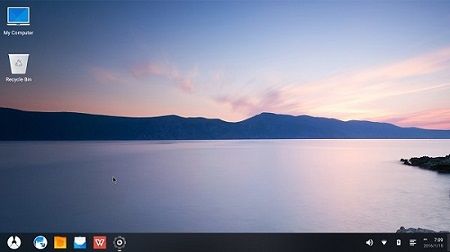
Screenshot
Downloads
Phoenix OS
Steps to Install Phoenix OS on PC
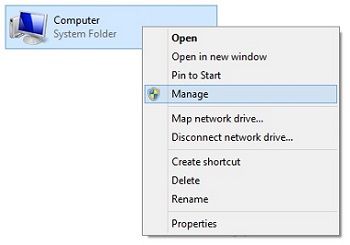
On your Windows PC, create a new Hard drive partition for Phoenix OS. For that, right-click My Computer, and select the Manage option.
This will launch the Computer Management window. Just select the Disk Management option under Storage.
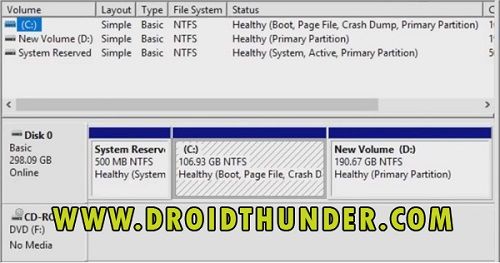
This will show the Local Hard drives present on your PC.
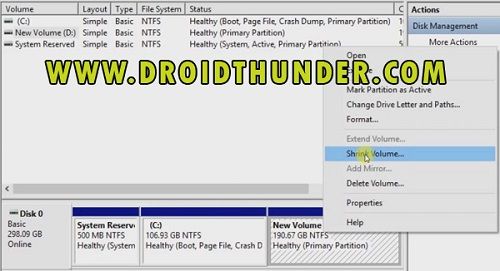
Here I’ll partition the Local disk (D:) to create a new partition of 20 GB for Phoenix OS. You can partition any of your Hard drives as per your choice. But make sure you create a new partition with a minimum of 20 GB free space. For making a partition, right-click Local Disk (D:) and select Shrink Volume option.
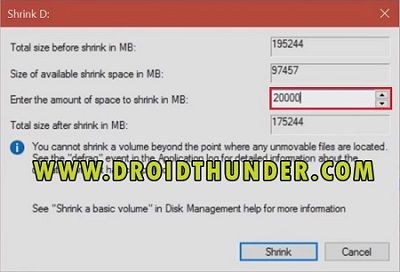
Enter the amount of space to shrink as 20000. Rest keep everything as it is. Then click on the Shrink option.
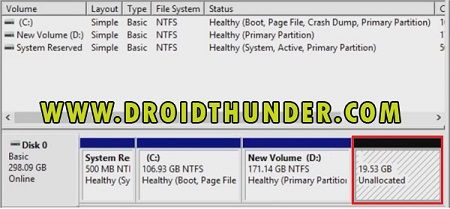
This will create a new unallocated drive as shown below:
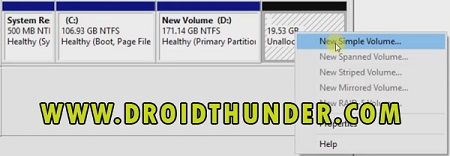
Right-click the Unallocated drive and select New Simple Volume option.
New Simple Volume Wizard will popup. Click on the Next option. Click on Next again. Keep pressing Next. Do not make any changes. Lastly, click on Finish. As soon as you click on Finish, a new partition of 20 GB will be created.
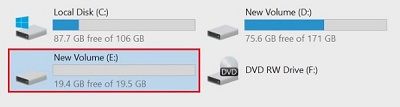
To confirm the same, go to My Computer and verify it.
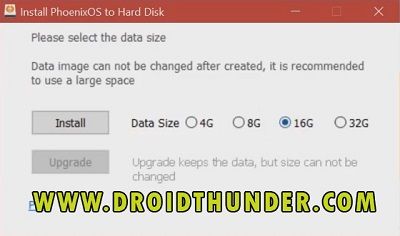
After successfully creating a new partition, let’s install Phoenix OS on your Windows PC. Download Phoenix OS Exe Installer from the download section. Let’s start the actual process to install Phoenix OS. Right-click the Phoenix OS Installer and run it as Administrator. Click on the Install option. Now select the target Hard disk where Phoenix OS can be installed. Here we’ve created a new partition (E:), hence select E Hard drive. Then click the Next option. Next, select the Data size as 16 GB. Then click on the Install option.
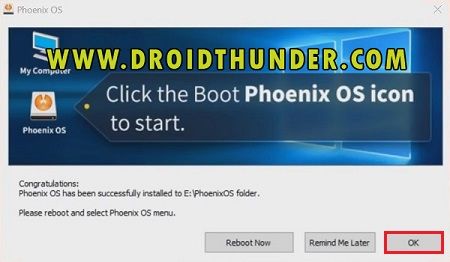
Thereupon, the installation process will start. Be patient and wait until it completes. After the installation process completes successfully, you’ll receive a message saying congratulations, Phoenix OS has been successfully installed.
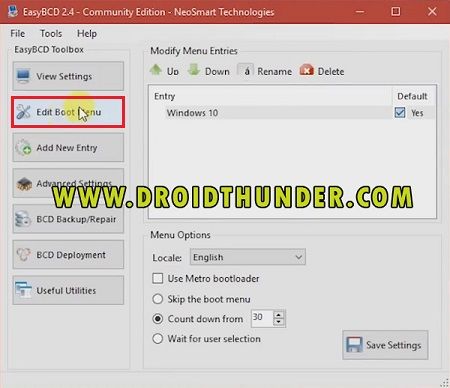
Click on OK. Do Not click on Reboot Now option. Moreover, download EasyBCD 2.4 software on your PC. EasyBCD (Easy Boot Configuration Data) is a powerful bootloader tool. Besides, this tool can help you run multiple operating systems on the same computer. Additionally, you can easily configure dual boot between Windows and Phoenix OS with this tool. Furthermore, the Phoenix OS boot problem and black screen on boot issue can be fixed using EasyBCD. Complete the Easy BCD setup installation process on your PC. Launch the EasyBCD 2.4 tool. Click on the Edit Boot Menu option.
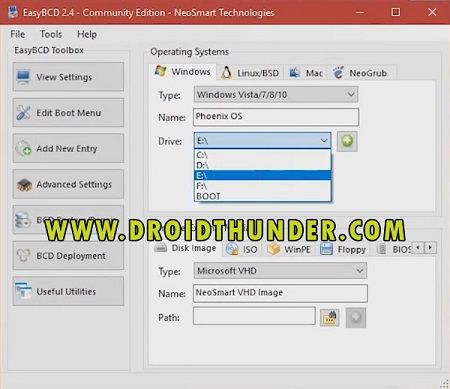
Then tap on the Add New Entry option. Select the Hard drive on which you’ve installed Phoenix OS. Here I’ll select Hard drive (E:)
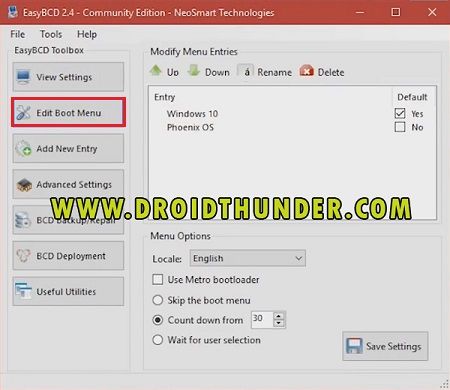
Furthermore, click on the Add button. Again go to Edit Boot Menu to confirm that New Entry is added successfully.
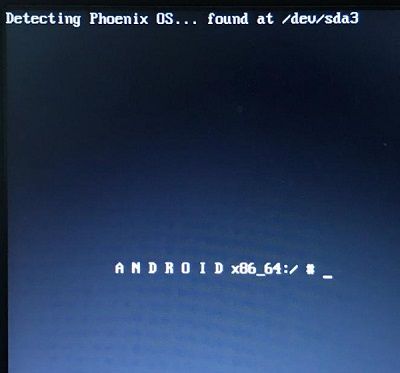
Save the Settings now. And close the EasyBCD tool. On your desktop, double click the Start Phoenix OS icon. Moreover, this will boot your PC into Phoenix operating system.
Select the English language and press Next. Then Accept the User License Agreement. Lastly, write the owner’s name and click on Finish. This is how you can install Phoenix OS on your Windows PC.
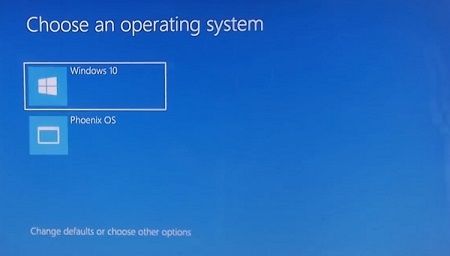
To go back to Windows OS, just restart your PC and select Windows from the boot menu options.
Conclusion
Finally! This is how you can install Phoenix OS on your Windows PC. This is an official way to install Android on a PC. Moreover, with this OS, you can perform all the tasks like Android devices especially play PUBG Mobile games without lag. If you have any questions, problems, or suggestions related to this tutorial, then feel free to comment below. Notify me of follow-up comments by email. Notify me of new posts by email.
Δ