This can be done by highlighting the cells you want before hitting Ctrl+P. But what if you want to print the same area on every page of your spreadsheet? We show you a few ways to make this happen.
What is a print area?
In Excel, print areas allow you to select cells on a worksheet which can then be printed off separate to the rest of the page. It’s handy if you tend to have a mixture of figures on your sheet, but only need particular ones for certain reports.
How can I create a print area?
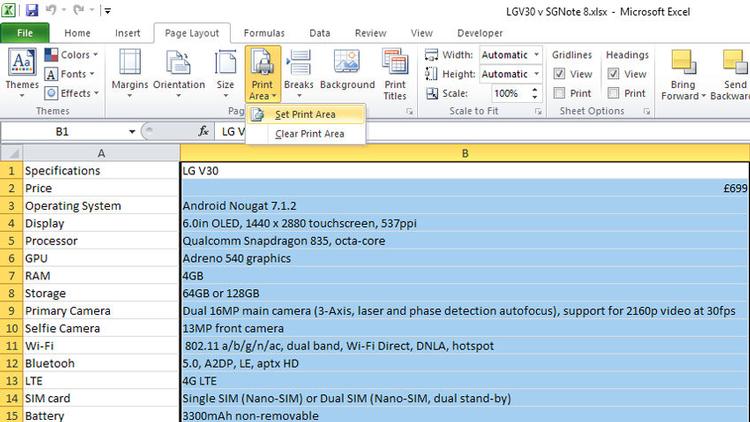
Open a worksheet in Excel, then highlight the cells you want to include. Next, click on the Page Layout tab at the top of the menu ribbon. In the Page Setup area you’ll see an option for Print Area. Click this then select Set Print Area.
Now when you go to print off this page it will only use the data in the print area. To clear this, simply go back to the Page Layout tab, select Print Area, then click on the Clear Print Area option. A worksheet can have multiple print areas, all created using the method outlined above. Note that these will all be printed as separate pages.
How can I create a print area on all sheets?
Sadly, Excel doesn’t have an automated way to replicate print areas on multiple sheets. The most obvious solution to this is simply to go through each one and manually set the print areas, which the software is happy to let you do. Obviously, this can get a bit laborious especially if you have a large workbook.
For new workbooks
If you’re only just beginning a workbook, and intend to use a print area that will be the same on every sheet, then there is a better solution. Lay out the page, create the print area, and then use this as a template for every sheet you add. Simply copy the sheet and the print area will come with it to the next one. For those who already have a lot of data in existing worksheets there are other options available.
Third-party solutions
The first is to use a third-party solution such as Kutools for Excel, which has a Copy Page Setup feature that allows you to apply a print area to multiple pages across a workbook. The best part of this is that you can skip over ones that you don’t want to print, so it isn’t an all-or-nothing approach. Kutools has a free thirty-day trial, but if you want to carry on using it you’ll need to purchase a copy, which currently costs around £30 (US$39).
Using macros
Lastly, if you’re happy to try your hand at macros, then there are many helpful variants available online. A very good one we came across was created by author Allen Wyatt, and is outlined on his Excel Tips blog. This macro will apply the print area on the current active sheet (the one that is displayed on your screen) to any other sheets in your workbook. If you’ve not used macros before, then check out our How to use macros in Excel guide to get yourself up to speed. Once you’re ready, create the macro outlined below, and you should soon have your print areas appearing in all sheets of your workbook. That’s it. A few ways to apply print areas across your whole workbook. If you want more tips on how to get the best out of Excel, then be sure to read our Best Excel Tips guide. Dim sPrintArea As String Dim wks As Worksheet sPrintArea = ActiveSheet.PageSetup.PrintArea For Each wks In ActiveWindow.SelectedSheets wks.PageSetup.PrintArea = sPrintArea Next Set wks = Nothing End Sub Martyn has been involved with tech ever since the arrival of his ZX Spectrum back in the early 80s. He covers iOS, Android, Windows and macOS, writing tutorials, buying guides and reviews for Macworld and its sister site Tech Advisor.