Unlike other services, Google boasts that the images and videos stored are full HD, not compressed/low resolution copies. Instead of saving your entire library to the Google Photos app, all images displayed are grabbed from the Photos server – if you think this translates to long image loading times, you’d be wrong. Google Photos was demo’d during the I/O event for everyone to see, and images loaded up in full HD as soon as they were opened. The best part? It’s available not only for Android, but iOS and web too. It’s also completely free, no matter how many photos you upload. But we’ll come to that later. See also: Everything you need to know about Android M
Google Photos: Automatic photo organisation
Google Photos learns what’s important to you and then organises your photos based upon that information. The aim is to let you enjoy taking photos without having to worry about trying to organise them all, and if the demo we saw today is any indication, Google has succeeded. It’ll sort your photos over time based on places, people and things that matter most to you – and the best part is that you don’t need to tag anyone or anything, it’s all done for you. The facial recognition feature is the most impressive method of organisation, as you can select a person and see all photos in your library that include them, from the moment they were born to modern day. However, it seems that the facial recognition feature isn’t available in all countries yet, and the UK is included in that list. You can also search using keywords, so you could type “football” to see all the photos taken at a football match. Layout wise, the most recent photos are at the top but you can pinch to zoom out from days > weeks > months > years and back again, much like you can using Apple’s Photos app.
Google Photos: Share photos with friends
Sharing photos with friends is almost too easy with Google Photos. You can select a single photo by pressing and holding on it, or you can select a group of photos by pressing and holding one photo, then dragging it over other photos you want to include. Once all the photos are selected, tap Share and “Get link” and you’ll be given a URL. This URL can be sent to any friend on any platform without the need for the Google Photos app. It’ll open in their browser, where they’ll be able to view the selected photos from your library in full HD instantly. If the person you’re sharing images with has a Google account, they can easily add the photos to their personal library with the click of a button. See also: Best Android phones of 2015
Google Photos: Edit photos and create collages
Google Photos not only lets you backup and browse your entire photo and video library, it also lets you edit your collection too. It offers fairly standard editing tools including Light, Colour, ‘Pop’ (kind of like Sharpen), Vignette, and if you don’t want to edit manually, there’s always the option to automatically enhance the photo. It works well, updating as you adjust the levels so you can fine-tune your edit. There’s also the option to add a number of Instragram-esque filters to your photo. Though we’re not generally fans of filters, they have quite a few to choose from for those that are partial to them. You can also adjust the intensity of the filter, a feature welcomed by many. It’s also worth noting that if you edit a photo in the Google Photos app and save it, you’ll be asked whether you want to update the photo in your stock image gallery (Photos for iOS users). It’s great being able to edit the photo in Google Photos and have the edit applied to the original photo too, and saves a lot of time when enhancing a group of photos. The same can be said when deleting photos – if you delete a photo from Google Photos, the corresponding photo in your stock image library will be deleted.
Google also boasts some pretty cool tools that will generate collages, GIFs and edits of photos in your library automatically. Taken a burst of photos with friends doing weird faces? Google Photos will take them all and put them into a single GIF, ready to share. It also suggests edits of photos – we had a photo of London Bridge in our library and the app automatically applied a B&W filter to it, making it look more professional. You can also manually create GIFs, movies, stories, animations and collages by selecting a group of photos in the Google Photos app and tapping the ‘+’ icon in the top right hand corner. It’s very simple to use but has great results.
Google Photos: Unlimited backup of photos and videos
We’ve saved the best bit of information until last. As we mentioned earlier, Google is offering unlimited backup of photos and videos via Google Photos. Google is the first big company to offer this kind of service, as the likes of Apple, Dropbox and Microsoft all charge for photo and video cloud storage. This means that you could theoretically store every photo and video you’ve ever taken in a single well-organised library without ever having to spend a penny. That is, of course, if you adhere to Google’s guidelines – the company has a limit of 16 megapixel photos and 1080p HD videos, but that’s fair enough if you’re only storing original resolution photos and videos right?
Google Photos: How to back up your photos for free
So, how do you use the Google Photos app to back up and share your photos? First things first, you need to install the app on your smartphone or tablet – it’s available now on Google Play, the App Store and on the web (for uploading images from your computer). For this tutorial, we’ll be using an iPhone 6 Plus so setup may differ slightly from its Android counterpart, but it should be a similar process overall.
Once you’ve downloaded the app, open it and you’ll be greeted with a Google-esque animation explaining the purpose of Google Photos. You can watch this, or ignore it and tap “Get Started”.
If you’ve never signed into a Google account on your smartphone before, you’ll be prompted to log in. If you have, you should automatically be logged in to your Google account. Make sure that “Backup & sync” is selected or your photos won’t be backed up, and decide whether you want to upload your photos and videos over a cellular connection. Backing up over a cellular connection is great because photos are instantly backed up, but the downside is that it’ll eat into your data allowance – a bad move for people with data limits on their contracts. Once you’ve decided, tap continue.
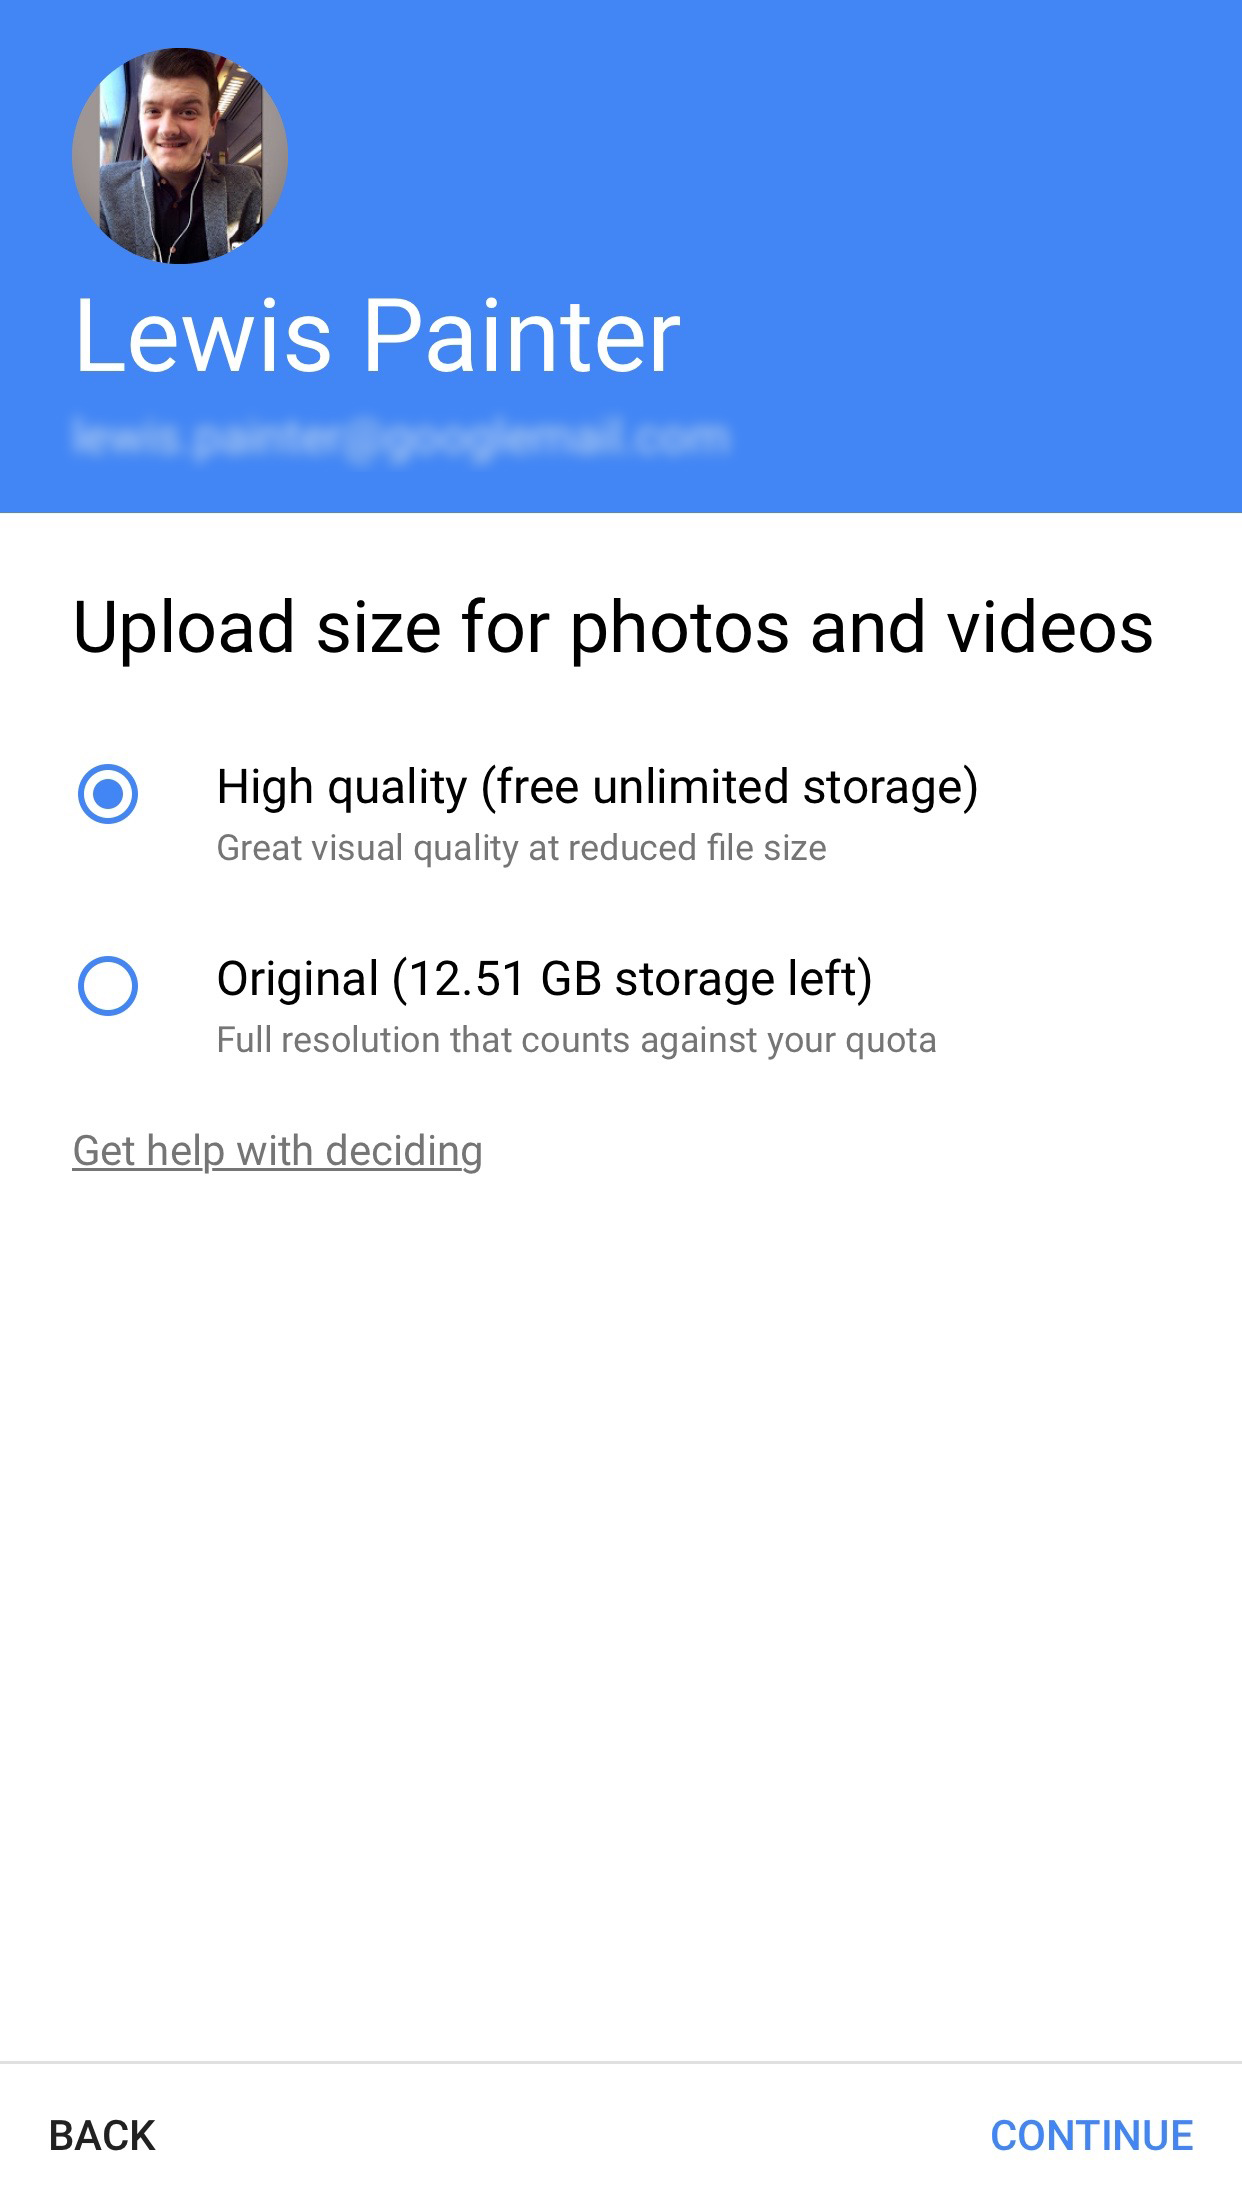
The next page will ask you whether you want to store high quality images and videos, or use your original files. This is a very important decision – the high quality option will reduce your file size without effecting quality, and the original files option will, as stated, upload the original files with no reduction. If you want to take Google up on their offer of free and unlimited storage, select high quality – if you select original files, it’ll eat up your Google Drive data allowance. Once you’ve made your decision, tap continue.
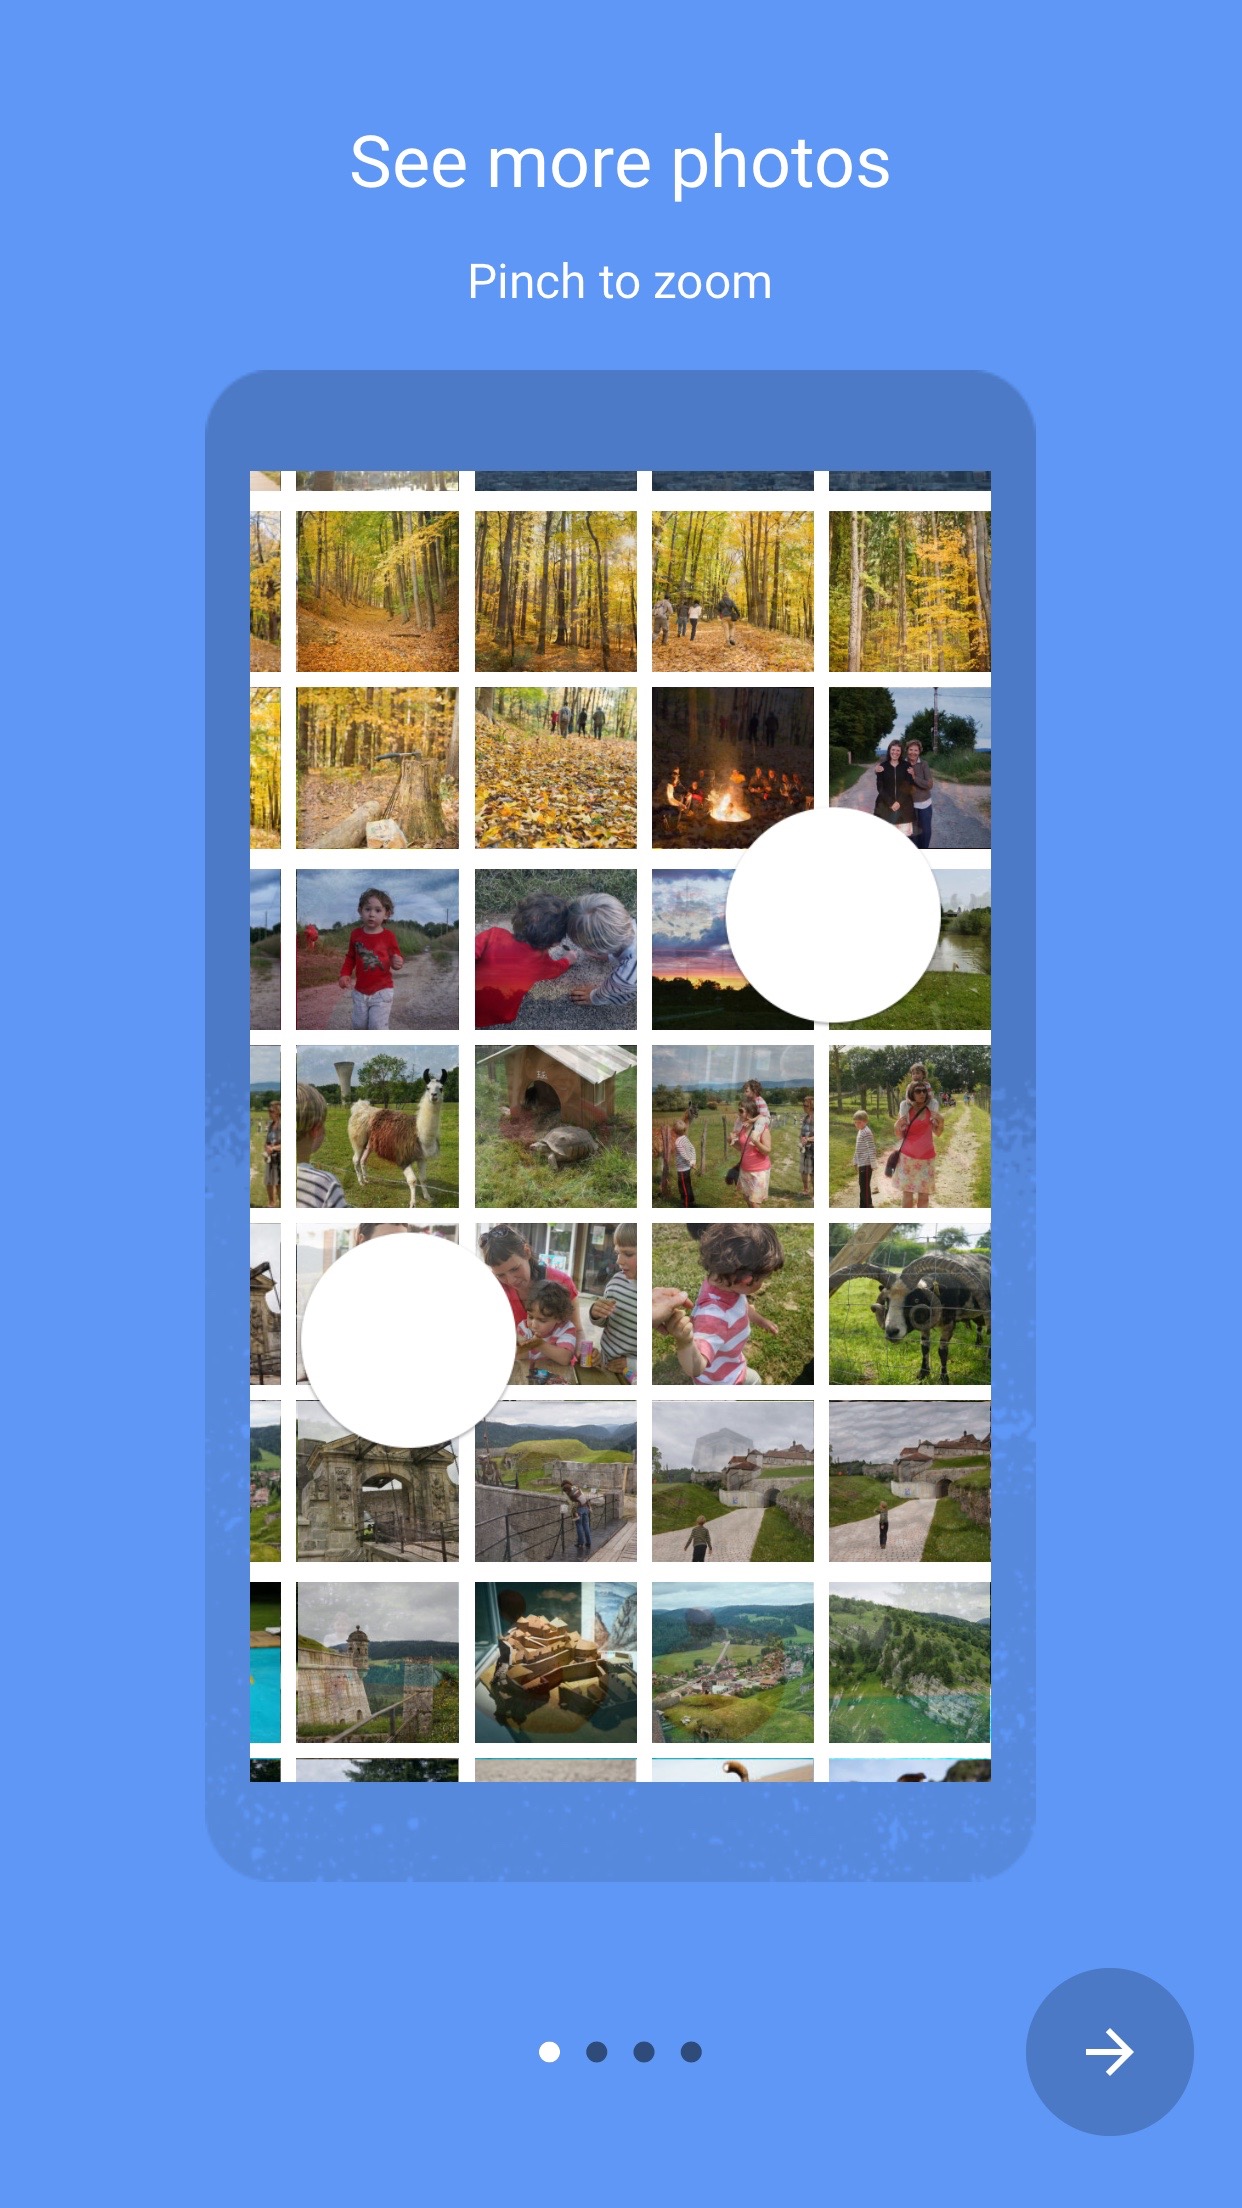
On the next page, you’ll be given an introduction on how to navigate around Google Photos and use certain features. The main points to take away here are that you can:
Pinch to zoom in and out of your photo collectionSelect multiple photos easily by tapping, holding and dragging a single photo over the images you want to selectSwipe left and right to navigate between menusUse search to easily find your photos
Once you’re done, tap the tick to exit the setup and start using the app. The app will then ask for permission to access your photo library, which you of course allow. Then your entire photo and video library will be brought into the Google photos app, where you’re free to browse, edit and share to your hearts content.
Photo backup should also start immediately, and you can see the status of your backup along with any collages, edits or GIFS that Google Photos has created from photos in your library. Icons will overlay your photos displaying the current status, with a red cloud indicating that it isn’t backed up, a sync icon to represent that it’s currently being backed up and if there’s no icon at all, it has already been backed up. If, when you access the Assistant, you’re greeted with a “preparing backup” card that doesn’t change, you’re not alone. We’ve had issues with Google Photos and getting it to backup photos on our iPhone 6 Plus. We’ve tried signing out and back in as well as deleting and reinstalling the app, but so far we’ve not found a way to kick-start the backup process. See also: How to make the Google Cardboard VR headset using Android or iPhone
Google Photos: How to share images from your library
So, what about sharing photos from your vast library? It’s a lot easier than you might think – especially if you’re looking to share a collection of photos with people.
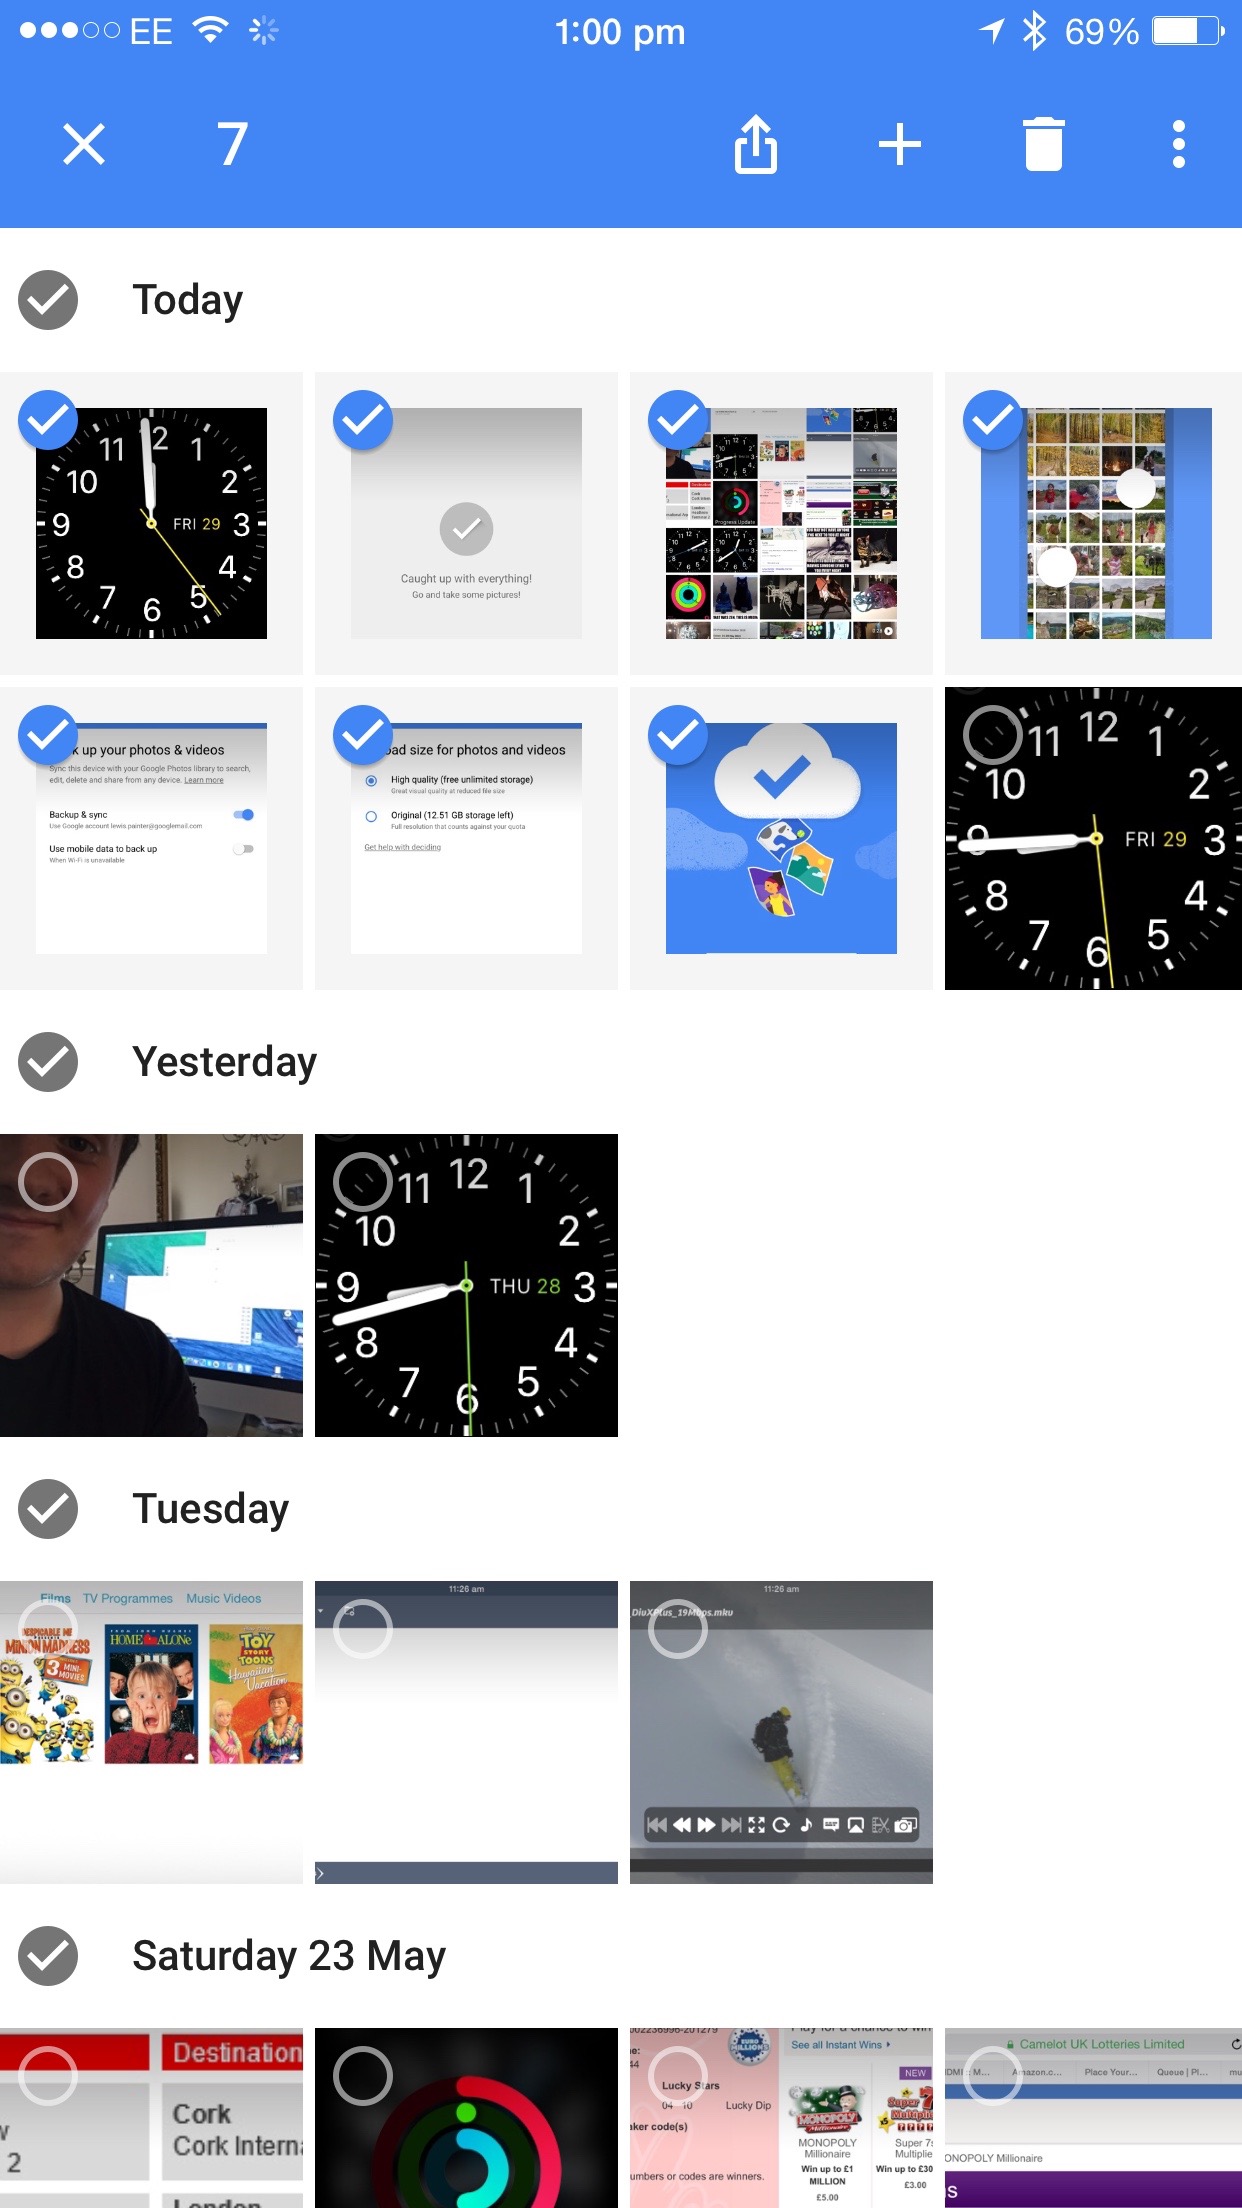
To select a photo to share, simply tap and hold to select it. Once you’ve selected a photo, you can drag your finger across any other photo to add it to the selection.
Once you’ve selected the photos you want to share, tap the Share button (3 dots on Android, box with arrow on iOS) and decide where you want to share your collection – Facebook, Twitter, Tumblr, etc. You may also notice another option entitled “Copy link to clipboard” which is the best way to share collections of photos with specific people without having to put them on Social Media for the whole world to see.
If you tap Copy link to clipboard, Google Photos will generate a unique link for you to send to your friends and family which contains the photos you wanted to share with them in full HD. The best part is that they don’t need a Google account or Google Photos installed, as it opens in browser. From there, they can save the photos manually to their phone/computer or if they have a Google account, save the photos to their own library.
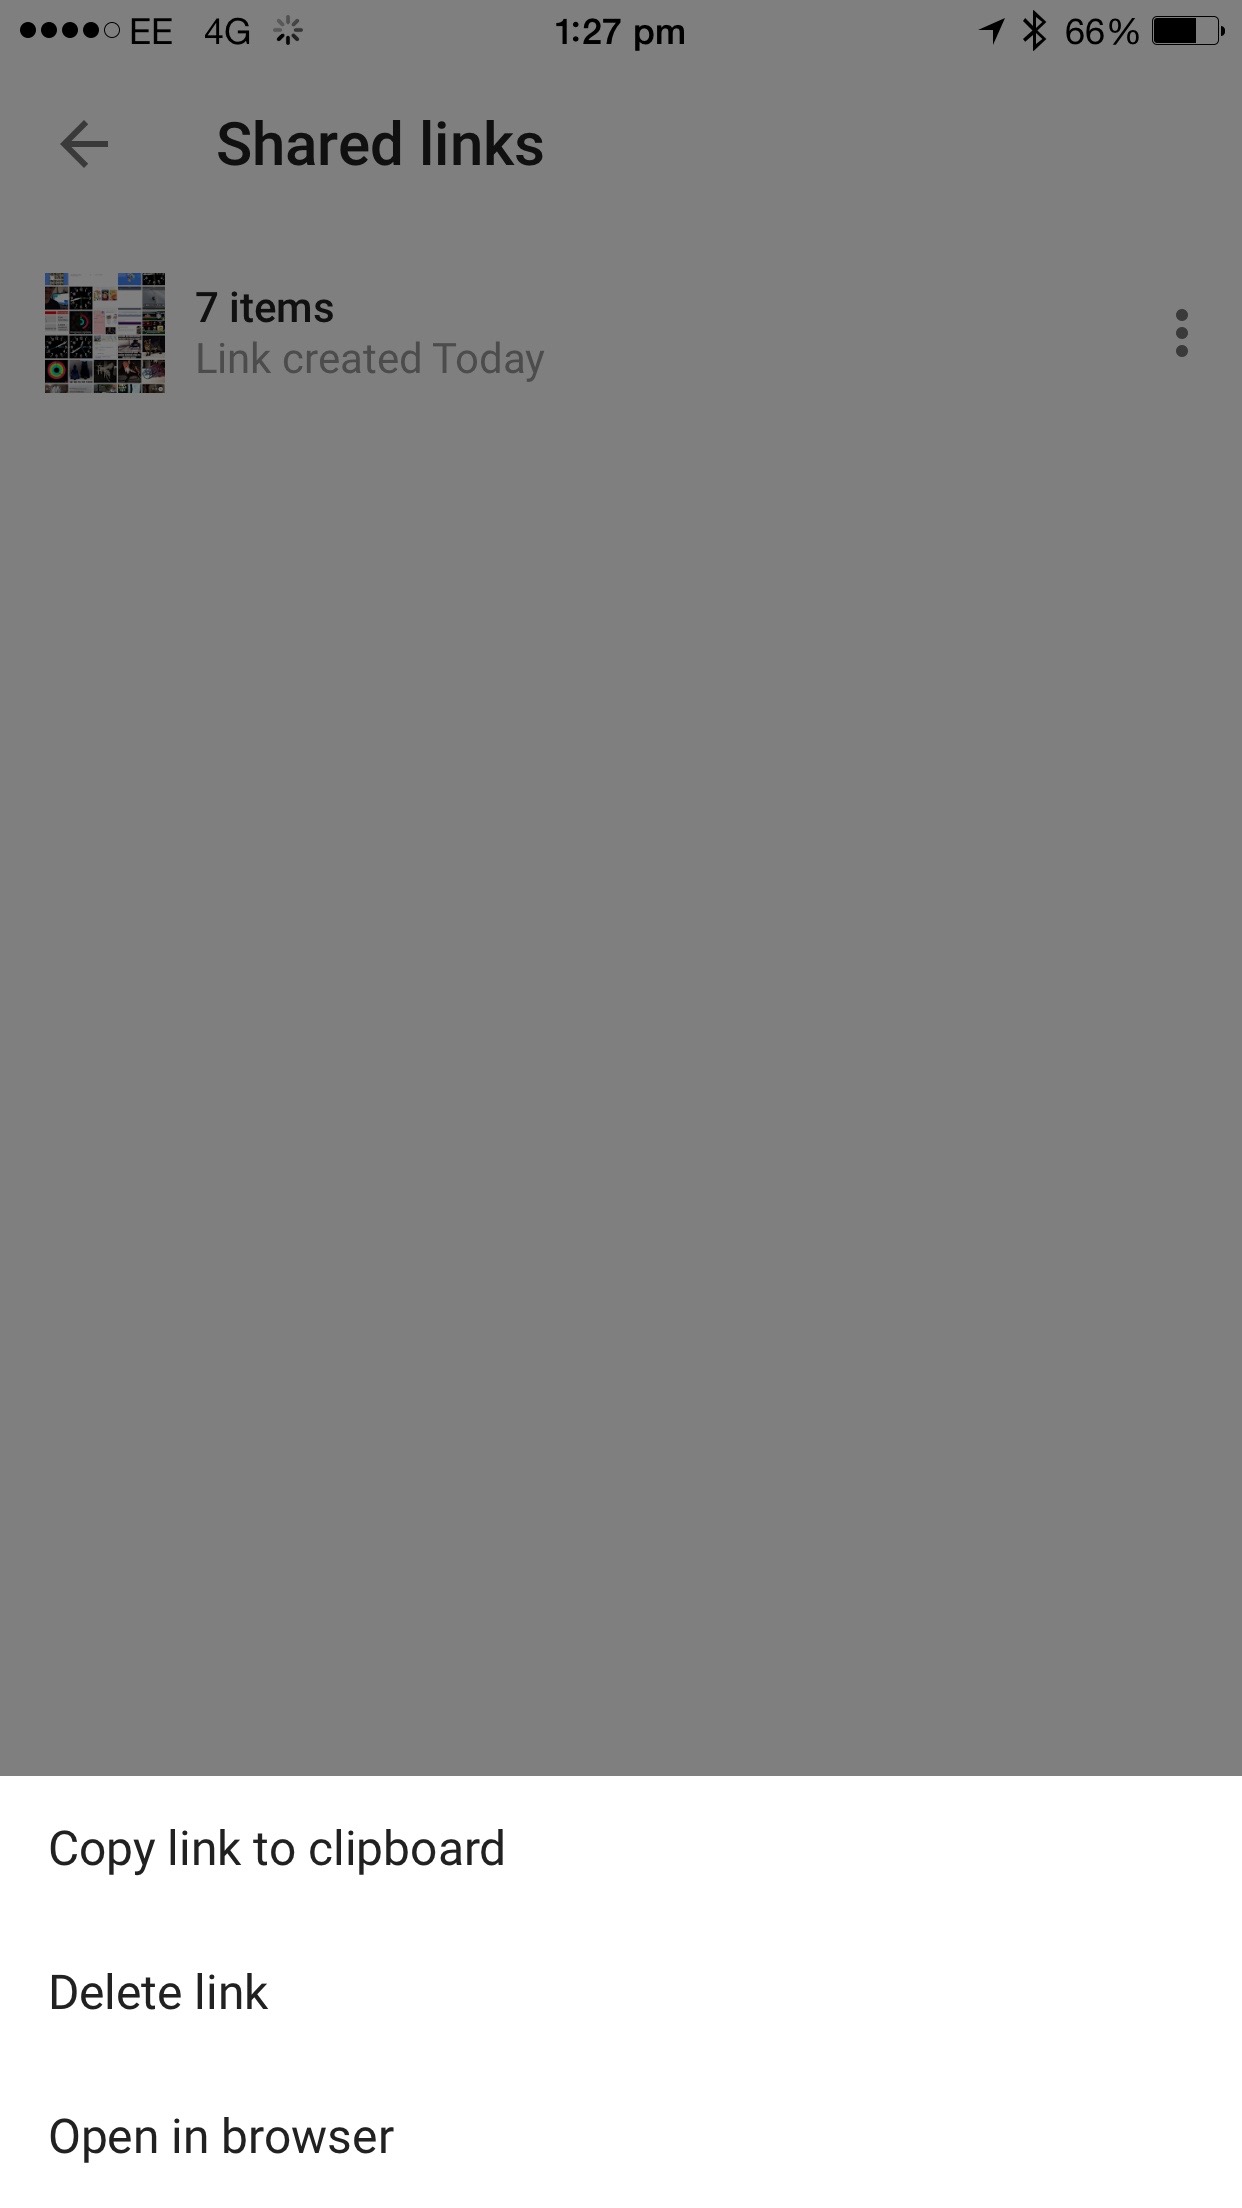
But what if you only want to share your photos for a limited time? Or if a link to an album of personal photos has been leaked? Not to worry, just navigate to the Shared Links menu in the Google Photos app, tap the three dots next to the album you want to delete, and tap “Delete link”. Read next: Best cloud service providers Lewis Painter is a Senior Staff Writer at Tech Advisor. Our resident Apple expert, Lewis covers everything from iPhone to AirPods, plus a range of smartphones, tablets, laptops and gaming hardware. You’ll also find him on the Tech Advisor YouTube channel.


